L'origami del fantasma. Sono tutti ottimi esercizi per la pazienza e l'abilità in fatto di motricità fine dei bambini. Sono semplici, alla portata di tutti.
Here we are, this is the last craft for Halloween (before the carved pumpkin!)
The origami of a ghost. They all are exercises for the patience and the capability in terms of fine motor skills of children. And they can be done by everybody, as they're simple..
Questa volta ho messo i passaggi per ottenere un foglio quadrato da un foglio A4, che sono semplici, ma magari non ci si pensa...
Al solito dall'alto al basso, da sinistra a destra.
I primi 5 step sono per ottenere il foglio quadrato e si spiegano da sé.
Poi riaprite il quadrato mettendolo nella posizione a rombo. Prendete il vertice sinistro e piegatelo finché tocca la piega centrale, ottenendo un triangolo sul lato sinistro, come in foto 7, in basso a sinistra.
Ripetete partendo dal vertice destro. Otterrete una forma ad aquilone, come in figura 8, al centro in basso.
Prendete il nuovo vertice ottenuto a destra e ripiegatelo fino alla piega centrale, come in foto 9, in basso a destra.
This time I added the steps to obtain a square sheet from an A4: they're simple, but sometimes you just don't think about it.
As always, from top left to bottom right.
The first five steps are to obtain a square sheet and don't need further explanation.
Once done, open the triangle you made to cut a square and put it in the diamond position.
Take the left vertex and fold it until it touches the central fold, obtaining a triangle on the left side, as in picture 7, bottom left.
Repeat starting from the right vertex. You'll obtain a shape that resembles a kite, as in picture 8, bottom center.
Take the newly obtained right vertex and fold it until it touches the central fold, like in picture 9, bottom right.
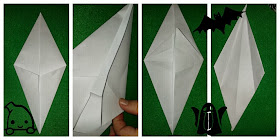
Ripetete l'ultimo passaggio partendo dal nuovo vertice sinistro e otterrete una forma come nella prima immagine a sinistra.
Ora viene un passaggio leggermente più complicato: dovete sollevare il triangolo inferiore destro che avete ottenuto, "gonfiarlo" e rischiacciarlo verso l'altro, ottenendo un triangolo come quello in basso a destra nella terza immagine.
Ripetere sul lato sinistro. Giare l'origami. Fate due pieghe come le due nella figura in basso a destra.
Repeat the last step starting from the new vertex on the left, and you'll obtain a shape like the one in the first picture on the left.
Now comes a slightly more complicated step: you'll have to lift the lower right triangle that you obtained, "inflating" it and flattening it upwards, obtaining a triangle just like the one bottom right in the third picture.
Repeat on the left side. Turn your origami. Make two folds like in the picture bottom right above.
Piegate bene e rigirate l'origami. Piegate verso il basso le due punte piccole, come nella seconda e terza immagine da sinistra. Piegate il triangolo più in alto verso il retro dell'origami. Piegate la punta inferiore come nella foto in basso a destra.
Fold well and then turn your origami. Now take the two tiny spikes in the middle of the origami and turn them down, folding well. Take to top vertex and fold backwards. Take the bottom spike and fold like in the picture bottom right.
Piegate ancora una volta verso il basso la coda den fantasma. Prendete un pennarello e disegnate un volto a piacere!
Fold once again towards the bottom the tail of the ghost. With a felt pen, draw a face as you please!


Nessun commento:
Posta un commento