
Ed eccoci già in Ottobre. E il 31 si festeggia Halloween. Per molti nell'Europa continentale non è una tradizione "tipica", anche se è la stessa cosa del festeggiare la notte dei morti (il giorno dei morti il 1 novembre), ma poichè molti ne vedono solo l'aspetto carnascialesco, ritengono sciocco festeggiare Halloween, che invece era ed è un modo per sdrammatizzare questa altrimenti triste ricorrenza.
E poichè fa freddo e spesso piove, noi ci dilettiamo col preparare le decorazioni adatte, anche se poi non è che Halloween si festeggi in modo particolare. Non solo, ci piacciono i colori autunnali, perciò ne approfittiamo per decorare tutto in quei colori (arancione, nero, foglie variopinte, ecc.)
And here we are, it's already October. And on October 31 it's Halloween. Form many people in continental Europe it's not a "typical" tradition, even though there's a Day for the Dead on November 1, but as many see only the Carnival-like side of Halloween, they think preparing for Halloween is silly, but Halloween was just a way to make a better day out of a sad one. And as it's cold and it rains quite often, we're having fun preparing decorations for Halloween, even if we don't really have a party on that date. Not only because of bad weather: the truth is we like autumn colors and we prepare arts and crafts in those nice colours: orange, black, coloured leaves, etc.
Il primo gruppo di decorazioni è stato fatto anche per esercitare la motricità fine dei bimbi: abbiamo preparato delle belle ragnatele, piegando bene la carta e ritagliando strisce e buchi anche molto piccoli, le abbiamo colorate e ora sono pronte per essere appese al nostro candeliere:
The first set of decorations was made also to exercise fine motor skills in the kids: we prepared spider webs, folding paper and cutting them the way we desired, then we coloured them, and now they're ready to be hung from our chandelier:
Abbiamo cominciato da un semplice foglio bianco formato A4, ne abbiamo ottenuto un quadrato piegandolo e tagliandolo, e poi abbiamo seguito una serie di passi di piegatura qui di seguito illustrati:
We started from a simple A4 white piece of paper, we obtained from it, folding and cutting, a square paper and then we followed a number of steps of folding pictured here:

- dopo aver ottenuto un quadrato, si piega in due il foglio, tenendo la parte aperta verso l'alto. Poi si dà una piegatura di nuovo a metà, sempre tenendo la parte aperta in alto e senza ripiegare il foglio: ci serve solo una piega che indichi la metà.
- Si prende il lato destro del foglio e si piega un triangolo, arrivando con il vertice inferiore alla metà del foglio, ovvero dove abbiamo fatto seconda la piegatura.
- si gira il foglio e si piega un altro triangolo, seguendo il lato del precedente triangolo, partendo dal vertice inferiore. Si ottiene così
- un triangolo con due punte sporgenti alla base (che è in alto), una forma un po' strana.
- come sopra
- si traccia una riga dove poi si taglierà il foglio per ottenere un vero e proprio triangolo, senza punte strane.
- si taglia dove segnato in rosso, poi si ripiega il triangolo a metà per formare un triangolo più piccolo.
- se si taglia con la mano destra, si tiene il lato aperto a destra, se si taglia con la mano sinistra, si tiene il lato aperto a sinistra. E si tracciano le righe dove si vuole tagliare per formare la ragnatela. Io ne ho fatta una stondata alla base e una serie simili dalla base al vertice. Poi ho deciso di fare un buco centrale, quindi ho tagliato via il vertice.
- From the A4 sheet, obtain a square folding and cutting it. After having obtained a square, fold the sheet in two, keeping the open side up. Fold it in half again, keeping the opening up, to obtain a fold in the middle, even if we're going to keep the sheet folded in two.
- Take the right side of the sheet and fold it in a triangle, maintaining the lower corner of the triangle at the bottom in the middle, where we folded the sheet previously.
- turn the sheet and make a second triangle, following the side of the previous one on the opposite side, starting from the lower corner. This way you'll obtain
- A triangle with two strange points coming out of the base, which is, at the moment, at the top. A strange form.
- the same picture as above
- draw a line where you'll cut later to make it a right triangle, without strange points;
- cut along the red line, then fold once again the triangle to obtain a smaller one
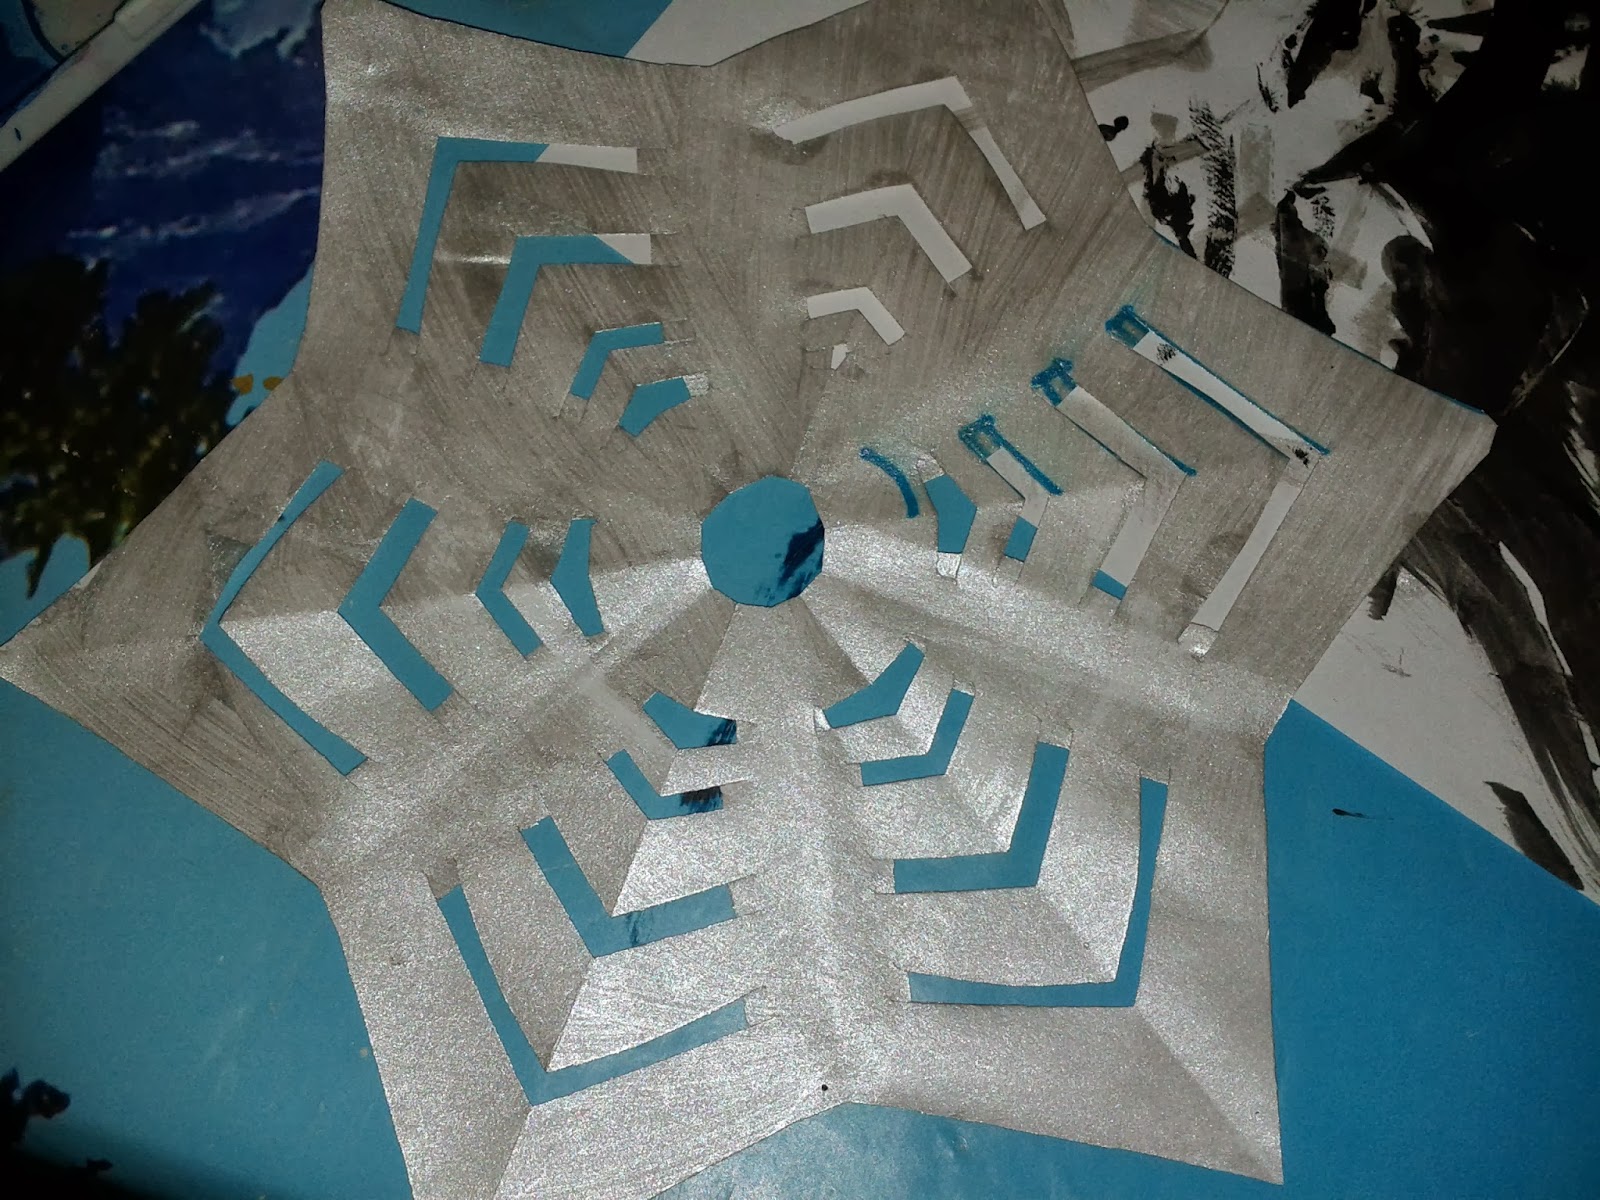
- if you use your scissors with the right hand, keep the opening to the right. If you use them with the left hand, keep it to the left. Draw the lines where you want your openings to be. I made a rounded line at the base and some simple ones to mark the web, then I cut the top corner away to make a hole in the middle.


Start cutting along the lines: it will be harder with a very small pair of scissors because the paper is a little bit thick, but with a larger pair it will be easy.

Aprite la vostra ragnatela con cura:

Open your web with care:

E poi dipingetela come più vi aggrada. Ora potete appenderla, attaccarla alle finestre, farne ciò che volete!

Then paint it as you like. Now you can hang it from a chandelier, attach it to the window or use as you like!
Noi ne abbiamo fatta una rgento con i glitter e una nera con il ragno rosa:


We painted one silver, glittering, and another one black, with a pink spider:
And then we hung them from the chandelier. Very much in Halloween style!
Nessun commento:
Posta un commento